Hearing help –
the App for iPhone, iPod und iPad
Operation
Version
Documentation: Rev. 1.2
Date 18.01.2014
for
Software Rev. 1.30
Date 17.01.2014
Dr.-Ing.Peer Dahl Keplerstr. 44 D-75175 Pforzheim Tel: 07231-650332 Fax: 07231-965186 e-mail: P.Dahl@ind-technik.de

Content
4.5.2.3 Information microphone level
4.5.2.5 Level limiter adjuser left ear
4.5.2.6 Information output level left ear
4.5.2.8 Level limiter adjuser right ear
4.5.2.9 Information output level right ear
4.8.2.3 Real-time noise filter to reduce noise such as from the iPod microphone
4.8.2.4 Microphone-Modes: Mono / 2-Channel / Stereo
4.8.2.5 Loading and saving profiles
1 Preface
The app hearing help generates an adjustable tone signal that is hearable through headphones. Just as in the case of other audio programs - for example the music player - it is important to adjust the volume not higher than necessary to avoid a hearing impairment. An excessive volume is a well known reason for hearing loss and ear fatigue.
Please read the instructions carefully and completely to learn more about the settings and the adjusters to limit the volume.
Ask a normal hearing person to check your setting acoustically.
Please ask in doubt your ENT doctor.
2 Description
Hearing help is a powerful program that is intended as a hearing aid as well as for ear training. Hearing help strengthens the microphone signal of your iPhone, iPod or iPad and processes it in a way that individual hearing deficiencies are corrected as best as possible. For this purpose, hearing help includes the following modules:
- 16-band filter audiogram according to DIN EN ISO 8253
- 16-band equalizer + / - 15 dB
- Frequency band choke to avoid listening fatigue and hearing loss at overdriven frequencies
- Dynamic compressor to avoid listening fatigue and hearing loss due to a high volume because of e.g. sound events close to the microphone
- Real-time noise filter to reduce noise such as from the iPod’s microphone
The sound processing is done almost in real time without disturbing echo formation.
The filtering is absolutely linear phase using a modified proprietary algorithm (patent DE4224842A1, Peer Dahl).
More Information and the operating manual, see
http://www.ind-technik.eu/software/hearinghelpforiphone/index.html
3 Installation

After downloading the
app and at its first launch, you can change the language. Please press the Home
Menu "Settings" or "Einstellungen" ![]() and
select the language by pressing the corresponding flag. The setting is stored at
once and must not be carried out again.
and
select the language by pressing the corresponding flag. The setting is stored at
once and must not be carried out again.
4 Operation
Just as the hearing aid acousticians equipment so must also hearing help be setted up individually. You can perform this yourself using various menus.
Please read this section carefully and completely, to get maximum benefit from this app, and especially to benefit from its hearing protection functions. Please ask your medical practitioner before using this program.
Please note:
If the volume is too loud this can always damage your hearing. Please adjust the volume you need to a value not higher than absolutely necessary. Ask a normal hearing person to confirm this. Pleasant headphone sounds are usually beneficial, but can be also dangerous at a high volume.
Please also note:
This app does not substitute a professional hearing aid coming from a professional hearing aid acoustician.
4.1 Brief instruction
The basic steps are the following:
Step 1:
In the menu
"Your Audiogram ..." ![]() enter your
audiograms for the left - and by pressing "next"
enter your
audiograms for the left - and by pressing "next" ![]() in the
header bar then the right ear.
in the
header bar then the right ear.
If you do not have an audiogram or the measure is some time ago, you can also experiment a little. Be careful, because even small deviations of individual frequency band adjuster from 0 dB (gain 1) will amplify the volume for this frequency significantly. For example an increase of 20 dB corresponds already to a factor of 10!
Step 2:
Choose menu
"Equalizer" ![]() for a pleasant tone
correction. First for the left and then by pressing "next"
for a pleasant tone
correction. First for the left and then by pressing "next" ![]() in the
header bar for the right ear. The offered presets may already be appropriate,
see button
in the
header bar for the right ear. The offered presets may already be appropriate,
see button  .
.
Step 3:
Set in the menu
"Dynamic" ![]() a suitable gain
with the sliders "Volume" for the left ear
a suitable gain
with the sliders "Volume" for the left ear
![]()
and right ear:
![]()
Adjust the volume limit (the adjuster below "Volume")
![]()
and
![]()
to a low value.
Step 4:
In the menu
"Settings" ![]() adjust
the slider "Maximal level accentuation"
adjust
the slider "Maximal level accentuation"
only higher, if you think that the strength of the tone correction is not sufficient.
Check if the noise filter and its noise threshold

sounds pleasant to you.
Step 5:
Ask a normal hearing person to audit your setting.
Step 6:
Save your profile
in the menu "Settings" ![]() on a free profile
location:
on a free profile
location: ![]()
The following sections describe the required controls in more detail.
4.2 Start of program
When you start hearing help, the program displays the following menu:
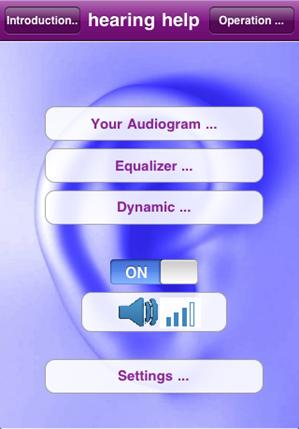
Figure 4‑1: Start menu
The points
- Audiogram
- Equalizer
- Dynamics
- On/Off-switch
- Volume
- Settings
are described now.
4.3 Audiogram
The following figure shows the 16-band-audiogram as it is included in hearing help:
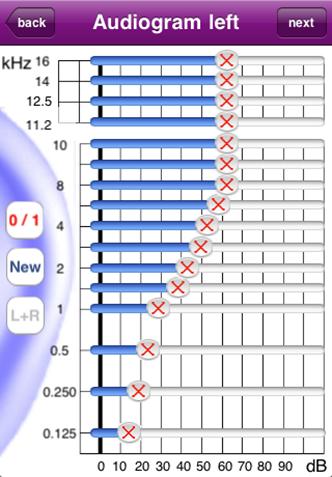
Figure 4‑2: Audiogram – left ear
4.3.1 Background
The audiogram represents the hearing separately for left and right ear according to DIN EN ISO 8253 and is created by otolaryngologists at a hearing test. The audiogram shows the hearing threshold for different frequencies.
The audiogram filter serves to correct the hearing defect on the basis of individual audiograms for the left and right ear. The microphone sound of an iPhone / iPad / iPod is corrected in adjustable limits.
Example:
In most cases, hearing loss shows a high range loss. This means that high tones
are perceived less and muted. In this case, a volume increase of the higher frequencies will cause a tone correction.
Corrections are not always possible, for example if there are serious hearing damages.
4.3.2 Setting
Please click on the
Start menu, click on "Your audiogram ..." ![]() .
.
Please enter your audiogram by moving the 16 sliders presenting your last test as accurately as possible.
Tip: If the
audiogram of the left and right ear is almost similar, click on [L + R] ![]() to
couple the two channels.
to
couple the two channels.
After entering data
for the left ear, please press "next" ![]() in the header bar
to access the settings for the right ear. Do you have "left" and
"right" coupled, this representation shows nothing new.
in the header bar
to access the settings for the right ear. Do you have "left" and
"right" coupled, this representation shows nothing new.
Tip: Keep your device across to meet the DIN-form better. The axis labels will adjust automatically.
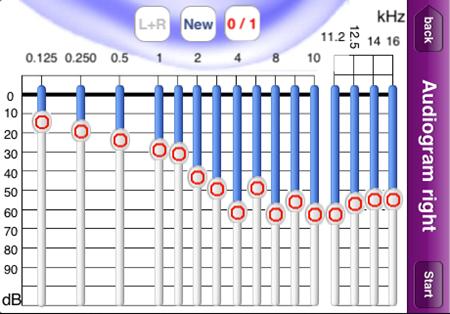
Figure 4‑3: Audiogram across – right ear
The following sections cover the additional buttons on this page.
4.3.2.1 On / Off
![]()
This button turns the sound adjustment pursuant the audiogram on or off. If you set it ON, the adjustment will be gradually and softly carried out in order to prevent the risk of an abrupt hearing impression.
4.3.2.2 New
![]()
This button adjusts all 16 sliders to the 0 dB – startposition (no gain or attenuation).
4.3.2.3 Button L+R
![]()
This key determines whether the left- and right-side settings are coupled. "Blue" shows the coupling, "gray" decoupling.
4.3.2.4 Next
![]()
In case of the view for the left ear this button points to the view for the right ear.
4.3.2.5 Start
![]()
In case of the view for the right ear this button points back to the start view.
4.4 16-Band-Equalizer
The following figure shows the 16-band-equalizer as it is included in hearing help.
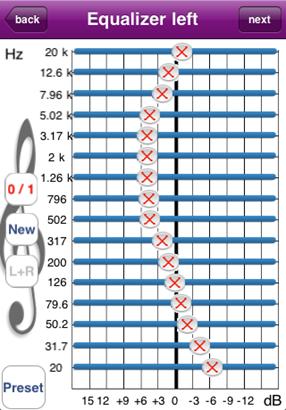
Figure 4‑4: Equalizer – left ear
4.4.1 Background
This filter adjusts the frequency response - with or without audiogram filter - for example to the heard sound, e.g. speech or music.
The equalizer can also be used as an alternative to audiogram filter to raise the volume of specific frequency ranges corresponding to the hearing defect.
Example:
In case of a high range defect the increase of the higher frequencies will increase the intelligibility of speech.
4.4.2 Setting
Please click the
button "Equalizer …" ![]() at the start menu..
at the start menu..
Manually enter an
equalizer setting or select a preset from the default preset list .
Tip:
Usually, the equalizer settings for left and right ear are almost similar, in
this case click on [L + R] ![]() to couple the two
channels.
to couple the two
channels.
Tip: Keep your device crossways to use the equalizer easily. The axis labels will be adjusted automatically.
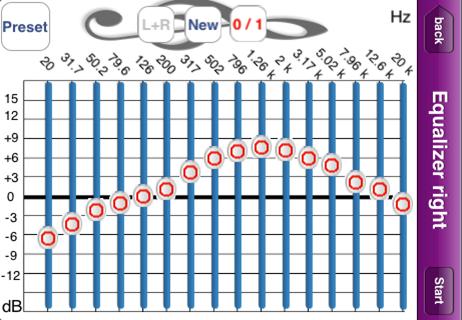
Figure 4‑5: Equalizer across – right ear
The following sections cover the additional buttons on this page.
4.4.2.1 On / Off
![]()
This button turns the sound adjustment according to the equalizer setting on or off. If you set it ON, the adjustment will be gradually and softly carried out in order to prevent the risk of an abrupt hearing impression.
4.4.2.2 New
![]()
This button adjusts all 16 sliders to the 0 dB- starting position (no gain or attenuation).
4.4.2.3 Button L+R
![]()
This key determines whether the left-and right-side settings are coupled. "Blue" shows the coupling, "gray" decoupling.
4.4.2.4 Next
![]()
In case of the view for the left ear this button points to the view for the right ear.
4.4.2.5 Start
![]()
In case of the view for the right ear this button points back to the start view.
4.5 Dynamic
The following figure shows the view „Dynamic“ as it is included in hearing help.
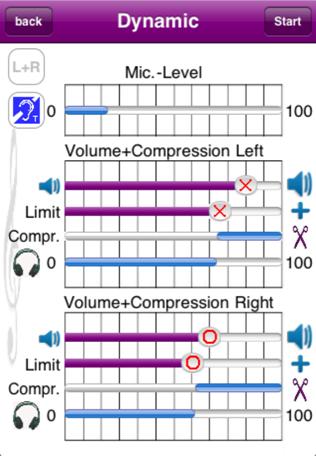
Figure 4‑6: Dynamic
4.5.1 Background
Sound events in the near range or touching the microphone cause much higher volume as sound events in the far range. For this will not injure the hearing, a real-time dynamic compressor limits the volume on an individually adjustable value. So you can enjoy the same high gain and volume without pulses.
The term "dynamic" therefore describes the behavior of volume, as the microphone input signal is converted to the headphone output.
Separately for the left and right ear it can be set:
- Gain
- Volume limit from which on the headphone signal is attenuated to protect your hearing
4.5.2 Setting
Please click at the
start menu the button "Dynamic ![]() .
.
This view shows some very important information and level adjusters.
The following elements can be seen from top to bottom:
- Information microphone level
- Gain slider left ear
- level limiter adjuster left ear
- Information output level left ear
- Gain slider right ear
- adjuster level limiter right ear
- Information output level right ear
These controls are now explained.
4.5.2.1 Button L+R
![]()
This key determines whether the left-and right-side settings are coupled. "Blue" shows the coupling, "gray" decoupling.
4.5.2.2 Button T-Coil
![]()
This key enables a preamplifier that may be useful in case of a plugged-in T-coil. “Blue” – preamp is on, “gray” – preamp is off.
4.5.2.3 Information microphone level
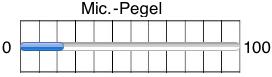
When someone is talking, the rash shows the volume level.
4.5.2.4 Gain slider left ear
![]()
Adjust the volume for the left ear with this slider.
4.5.2.5 Level limiter adjuser left ear
![]()
Especially sound events close to the microphone generate levels that can be harmful to the ear. The limiting does indeed take place always, but this slider further decreases the level limit. The amount is shown by the compression “Compr.” Bar.
4.5.2.6 Information output level left ear
![]()
When someone is talking, the rash shows the head phones volume level for the left ear.
4.5.2.7 Gain slider right ear
![]()
Adjust the volume for the right ear with this slider.
4.5.2.8 Level limiter adjuser right ear
![]()
Especially sound events close to the microphone generate levels that can be harmful to the ear. The limiting does indeed take place always, but this slider further decreases the level limit. The amount is shown by the compression “Compr.” Bar.
4.5.2.9 Information output level right ear
![]()
When someone is talking, the rash shows the head phones volume level for the right ear.
4.5.2.10 Start
![]()
This button points back to the start view.
4.6 On / Off switch
![]()
By means of this switch the playback is setted on and off.
4.7 Volume

This button leads to a dialog for changing the sound volume. The effect is the same as changing the volume using the hardware buttons on the device’s side.
4.8 Settings
The following figure shows the view „Settings“ as it is included in hearing help .
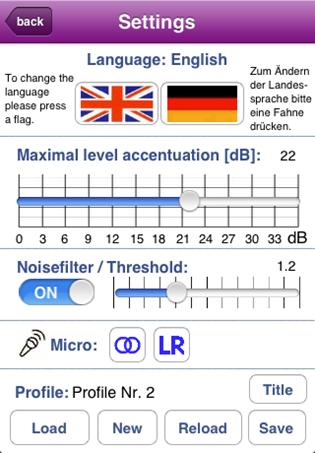
Figure 4‑7: Settings
4.8.1 Background
This page shows the settings that should probably be changed seldom:
- Choice of language
- Frequency band choke to avoid listening fatigue and hearing impairment at specific frequencies
- Real-time noise filter to reduce noise such as from the iPod microphone
4.8.2 Setting
4.8.2.1 Choice of language
Press on a flag to change the language. This setting is stored at once.
4.8.2.2 Frequency band choke to avoid listening fatigue and hearing impairment at specific frequencies
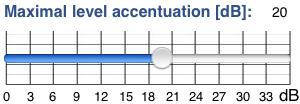
If the hearing impairment strongly affects or inhibits the perception of certain frequencies a too strong gain of these frequencies can harm the hearing. This is prevented by this adjustable choke. Set it as low as possible. A value of 0 dB inhibits any correction. A value of 20 dB allows a gain of up to factor 10.
4.8.2.3 Real-time noise filter to reduce noise such as from the iPod microphone
The individually adjustable real time noise filter filters the noise e.g. from the iPod microphone.
The higher the threshold is set, the less noise is audible. However, the sensitivity is reduced accordingly.
The noise filter can be switched on and off. This setting automatically follows the threshold slider position.
4.8.2.4 Microphone-Modes: Mono / 2-Channel / Stereo
![]()
Most devices have 2 microphones for stereo usage. Since version 1.30 Hearing help processes both microphone signals. Via the left button there are 3 modes available:
![]() 1-Channel mode,
mono: The microphone signal serves as input for the left channel as well as for
the right channel. This mode is for useful for devices that have got only one
microphone and if the signal is not shared with both channels internally.
1-Channel mode,
mono: The microphone signal serves as input for the left channel as well as for
the right channel. This mode is for useful for devices that have got only one
microphone and if the signal is not shared with both channels internally.
![]() 2-Channel mode,
mono: Both microphone signals are added an averaged. This causes the directional
effect to get lost, but it reduces the amplifier noise.
2-Channel mode,
mono: Both microphone signals are added an averaged. This causes the directional
effect to get lost, but it reduces the amplifier noise.
![]() Stereo mode: Both
microphone signals are processed individually.
Stereo mode: Both
microphone signals are processed individually.
In the stereo mode
the button „LR“ ![]() is
active. It allows an electrical reverse left to right of the microphone signals
to consider the direction of the device regarding the sound source.
is
active. It allows an electrical reverse left to right of the microphone signals
to consider the direction of the device regarding the sound source.
4.8.2.5 Loading and saving profiles

The app includes 2 example profile settings and 4 free available profile memory cells.
The
button “Load” ![]() opens
a dialogue that shows the profiles and allows the choice of one of them. The
profile’s name is e.g.
opens
a dialogue that shows the profiles and allows the choice of one of them. The
profile’s name is e.g. ![]() .
.
The
button “New” ![]() resets all setting. Saved
profiles do NOT get lost.
resets all setting. Saved
profiles do NOT get lost.
The button “Reload”
![]() overwrites
the actual settings with the settings of the indicated profile.
overwrites
the actual settings with the settings of the indicated profile.
The button “Save” ![]() opens a
dialogue that shows all profiles and allows the choice of one of them.
opens a
dialogue that shows all profiles and allows the choice of one of them.
The button “Title” ![]() leads to
a dialogue to enter an individual profile name. The changing of the title must
be confirmed via saving the profile.
leads to
a dialogue to enter an individual profile name. The changing of the title must
be confirmed via saving the profile.
5 Table of figures
Figure 4‑2: Audiogram – left ear
Figure 4‑3: Audiogram across – right ear
Figure 4‑4: Equalizer – left ear
Figure 4‑5: Equalizer across – right ear
This page was intentionally left blank